Thursday, March 22, 2012

A Happy Green Pancake Recipe

My little guy is a FAN of Pancakes!!  If you ask him what he wants for breakfast he will most often squeal “PANCAKES”!  So…I was on the hunt for a good recipe I could make myself that was easy and delicious…Here is what we have come up with!


A Happy Green Pancake Recipe
1 cup flour
½ tsp baking powder
¼ tsp baking soda
¼ tsp salt
1 tsp sugar
Mix dry ingredients together
Optional additions: cinnamon, brown sugar, berries, chocolate chips

1 cup milk (we use nonfat)
¼ cup vanilla creamer (to thicken it up and make them delicious)
1 tsp butter
Mix liquid ingredients into the dry ingredients and stir until well mixed. 


I then put the batter into a squirt bottle – because we love to make fun shape pancakes!! 

Flip pancakes after they are golden brown on one side and then cook until golden brown on the other side.  Add your favorite topping and ENJOY!!
-  Kristin

Friday, March 16, 2012

Dig For Victory!

At the start of WWII the Government realized that they would not have enough food to feed the people if the war lasted for more than a few months. Before the war Britain imported over 55 million tons of food a year - much of it from Canada and the USA. Once the war started, the ships once used for hauling food across the ocean were either needed for transporting troops and ammunition or were targeted by the enemy. In order to feed the people the British government launched 'The Dig for Victory' campaign.  People were urged to use gardens and every spare piece of land to grow vegetables. Even the Tower of London was used to grow veggies! In the United States we had the Victory Garden Campaign.
People joined together to fight their enemies, protect one another, and help provide for everyone. Today we need to dig again for victory. We need to join together to dig for the victory of our planet. Growing your own food reduces your environmental footprint, ensures that your family will be eating toxin free, and helps to teach our children that the planet is important- it provides for us and we must help protect it.


We want not only the big man with the plough but the little man with the spade to get busy this autumn. Let 'Dig for Victory' be the motto of everyone with a garden," said Rob Hudson, Minister for Agriculture, in October 1939.


-Amanda

Thursday, March 15, 2012

New Scent Giveaway!

We LOVE our new April 'Hoppy' Green Life Scents and we want to share them with you!
We will send an April 'Hoppy Green Life sample pack to the first 5 fans who tell us what you are doing to make your family more green!


Tuesday, March 13, 2012

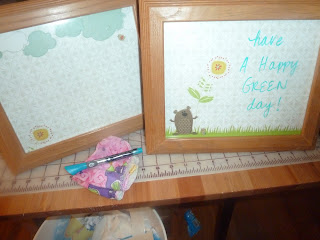
A Happy Green Message Board

I love finding new ways to be green.  I am a NOTE taker – my office is covered in little notes about orders, supplies, suppliers, things I need to remember for a little while – but then they end up in the garbage.  Not the greenest way to remember things for sure!  So I was thinking – there are lots of greener ways to notes – on the computer, on the phone, on a white board.  I am a pen and paper type of gal and I like the white board option – but white boards tend to be kind of expensive.  So I was on the hunt to find a cheaper way.  I found a picture of someone using an old picture frame and cute paper to make a cute dry erase message board and it sounded like the BEST idea! 
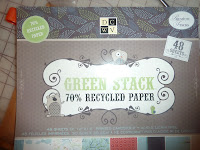
I found two frames at a garage sale for $2 and I have a stack of super cute recycled scrapbook paper – made from 70% recycled paper.  They are so easy to make.

1.       Cut the scrapbook paper to the size you need for your frame.  Use the frame inside to measure the right size – trace on the backside of the paper and then cut out. 
2.       Glue the paper to the inside of the frame cardboard.  I used a simple glue stick!
3.       Put the paper and cardboard back into the frame and close it up!
It was such a cute and easy way to make a dry erase message board.  I now have one by my desk to make notes for work and one in the kitchen to do a shopping and farmers market list or other general household notes.  If you use it to make your shopping list – simply snap a photo with your cell phone before leaving and you are set – no paper!
I hope you enjoy making your family A Happy Green Message Board!


- Kristin  

Monday, March 12, 2012

A Happy Green Backyard Garden

We have been working hard to get our Happy Green Garden up and running. We moved into our new house in December and we have been anxiously waiting for spring to start getting the backyard prepped and ready for some yummy gardening!
We started our compost almost immediately after we moved in, and we mixed in a lot of the end of fall leaves with the dirt at the bottom of our hill to let it decompose on its own to make great dirt. I love that you can make DIRT better.
This is the backyard after we moved in.
The boards along the bottom of the hill
It has been a long process and we still have a ways to go – but we are getting close to planting! We stopped by the hardware store over the weekend and picked up the boards to build some beds for planting. We are doing it this way to section off the gardening area so my 2 year old will stay out a bit and also to give us 10 more inches of dirt above ground. With the help of my dad we put in the boards – using a fairly easy process. We leveled out the ground and added the boards, putting rebar stakes behind to hold them up. The weight of the dirt inside the bed will anchor them in on the inside. Our long bed is 48’ down and about 5’ wide. We are going to plant up and down in rows to maximize our space. We also added a bed to the hill that is 8x4’, anchored in the same way.


Small bed on the hill
We ordered our dirt – it seems so strange to buy dirt – but we want to make sure that we have a good foundation for our plants. We ordered 6 yards of blended soil – it has good compost already mixed in and will provide a great amount of nutrients for our garden. It will be delivered next weekend so we can fill in the rest of the beds and get ready to plant!
The great thing about living in California is that spring comes quickly! The last frost has come and gone and it is getting close to time to get the plants in the soil. We have a rainy week in the forecast – so that will be great for the soil and then we will start planting next week!

Sunday, March 11, 2012

Deal Finder Dad Giveaway

Deal Finder Dad is an awesome blog helping Dads and Moms find great deals all over the web. Check it out and read the review of A Happy Green Life Laundry Wash and enter to win a bag of laundry wash!

Our visit to Soil Born Farms, The Farm on Hurly Way

This morning our family had a chance to visit The Farm on Hurly Way. The Hurly Farm (as Farmer Eric calls it) is a small urban farm that belongs to Soil Born Farms. This particular farm is managed by our good friend Farmer Eric and his partner Farmer Sarah.  
Farmer Eric
As starting out urban farmers we are in LOVE with Soil Born Farms. Back in 2000 Sean Harrison and Marco Franciosa, two friends who were young and inexperienced organic farmers (reminds me of us Happy Green Lifers) decided to start an Urban Agriculture and Education Project. Today youth and adults can visit the farm and learn to grow, eat, and love farming!
Farmer Sarah
Last year Farmer Eric and Farmer Sarah joined Soil Born Farms for their Farming Apprenticeship program. They started with 40 other applicants and worked their butts off until there was just four farmers left, their prize was wining their current position as co-managers of the Farm on Hurly Way (or the Hurly Farm).
Since taking over the farm the two have planted lettuce, artichokes, and TONS of garlic! Farmer Eric showed us their experimental espalier fruit trees. This is the process of training fruit tree branches to grow in a specific way. The trees on the Hurly Farm are being trained to grow into a wall.
espalier fruit trees
Over the winter the fields that weren’t full of crops were planted with vetch and oat grass. Vetch is a legume that is planted to put nitrogen back into the field between harvests. Farmer Eric pulled up some Vetch for us and showed us how it had been affected by a bacteria called Rhizobium. The rhizobium creates nitrogen nodules to grow on the roots. These put nitrogen back into the soil so that the next group of plants that grow there will have the proper nutrients to grow.
Nitrogen nodules
Rows of different lettuce
After checking out the plants we got to meet the farm ducks and chickens. Indian Runner ducks were chosen for the eggs that they will produce. They do not fly and they run instead of waddle, we got to see this as the men were trying to catch them to show the kids. The farm has a large variety of chickens also chosen for their eggs. Rhode Island Red, buff orpington, barred rock, araucana, and australorp’s can be found throughout the farm eating bugs and helping fertilize the ground.
Lots of Garlic!
We had a wonderful time visiting the farm. They invited us back to help work, which we will be doing so we can learn to work on our own farm. They will also being making a visit out to our little farm to help us harvest and plant our spring veggies!!
If you live in the Sacramento, CA area you need to check out Soil Born Farms. They have a lot of activates scheduled for families including a kids day and kids summer camp!! https://www.soilborn.org/

-Amanda

Wednesday, March 7, 2012

Just say no to glow!

Optical Brighteners aka Florescent Brightening Agents

Conventional laundry detergent with optical brighteners under a blue light
What are optical brighteners?
* Chemicals in conventional laundry detergent designed to make fabrics appear cleaner and brighter.

How do they work?
* The chemicals absorb ultra violent light and emit it back as a visible blue light. This blue light covers any yellowing and makes your fabric seem brighter and whiter. Your clothes are not cleaner but they look like it. 
 Why they are bad?
* Many times, skin rashes commonly blamed on fragrance and dyes are actually caused by optical brighteners. Brightening agents bind irreversibly to the skin and when in the sun can cause burns.
*Optical brighteners contain chemicals that are toxic to fish and other animal and plant life.
*They are slow to biodegrade, so they build up in waterways affecting the animals, plants, and anyone in contact with the water. 
Military uniform washed in optical brightener, check out the glow!
* Optical brighteners make your diapers appear cleaner by looking "whiter" through the refraction of light. These chemicals if loaded into the detergent can also compromise cloths diapers ability to absorb and make covers, pocket diapers and AIO's leaky.

What chemicals are optical brighteners?
* Triazine-stilbenes, Coumarins, Imidazolines, Diazoles, Triazoles, Benzoxazolines, Biphenyl-stilbenes, Disodium Diaminostilbene Disulfonate, benzoxazolyl, benzimidazoyl, naphthylimide
* Many times laundry detergents do not list the ingredients or they list them as brighteners or whiteners

 What laundry detergents use optical brighteners?
Dreft Powder
Era Liquid (all versions)
Gain Liquids (all versions)
Gain Powders (all versions)
Ivory Snow Liquid
Ivory Snow Powder
Tide Liquids (all versions)
Tide Powders (all versions)
Tide Tablets (all versions)
Fab (all versions)
Dynamo (all versions)
Ajax (all versions)
Suavitel Fabric Softener (all versions)
All laundry products made by Colgate-Palmolive
Arm & Hammer Liquid (all versions)
Arm & Hammer FabriCare Powder (all versions)
Arm & Hammer Fresh 'n Soft Fabric Softener (all versions)
Arm & Hammer Super Washing Soda
Rain Drops Water Softener and Detergent Booster
DeliCare Fine Fabric Wash (all versions)
Wisk (all versions)
All Liquid (all versions)
Surf Liquid (all versions)
Yes (all versions)
All Dial Laundry Products including:
Purex Powder (all versions)
Purex Liquid (all versions)
Purex Fabric Softener (all versions)
Purex Baby (all versions)
20 Mule Team Detergent (all versions)
Zout (all versions)


Choose a laundry wash that is non toxic to your family and the environment, just say no to the glow!
-Amanda

Friday, March 2, 2012

growing your veggie scraps


cut greens from your veggie roots
I love having plants in the house; they look great, fill the house with life (and oxygen). I recently started growing plants in my kitchen from clippings of our left over grocery’s (I got this idea on pinterest). The kids love this because it is super easy to get up, they can watch them grow and it is fast. We are currently growing celery and onions, next we are going to try potatoes avocado and lemons.
add roots to jar with some water
It is super easy; first take your left over veggies clippings, in this case scallions. Cut off the green and take your white bottoms with the roots attached and place them in a cup or bowl of water. We prefer to use mason jars because they are clear so that the kids can watch the entire growing process.

Place in a sunny location and make sure to keep your roots in water. When your new veggies sprout cut and add to your dinner!!!

Happy green growing (and eating)
-Amanda